
Documentation
Prestashop theme Universal
Documentation for Prestashop 9
Installation, update, configuration and Prestacrea Theme Editor module: every step is explained in detail.
Installation
Theme installation
Go to your shop's back-office and go to the section Design › Theme & Logo then click on Add a new theme at the top of the page.
Option 1 - Import from your computer: select the ZIP file of the theme and click on Save.
Option 2 - Import from FTP: select the ZIP file of the theme that you must first place in the folder themes of your shop from your FTP client and click on Save.
Once the operation is completed, activate the theme by clicking on the option Use this theme.
In case of error or blank page: refresh the page until activation of the theme is effective. This is a cache issue that does not affect the installation of the theme or its proper functioning.
Go to the section Advanced Parameters › Performance and click on Clear cache at the top of the page.
Theme update
Before you start, make a full backup of your shop (files and database). From a 1.x version of the theme, updating is not possible: a new installation is required.
Download the ZIP file of the new version of the theme from your customer account, without unzipping it.
Go to the configuration of the Prestacrea Theme Editor module, General tab, and click on the Theme update button, at the top right of the Child themes block.
Select the ZIP file and click on Analyze. The module checks that the file matches your version of Prestashop and that it is more recent than the installed version. It then lists the theme files you have modified, which will be replaced.
Click on Update. A backup of the current version is created automatically before the installation. Do not close the page during the operation.
Go to the Advanced Parameters › Performance section and click on Clear cache at the top of the page.
As long as you have not started a new update, the Restore the previous version button in the same window lets you restore the theme files and the module settings to their previous state. Changes made since then will be lost.
Major Prestashop upgrade (example: from PS 8 to PS 9): the Prestashop upgrade module disables the Prestacrea Theme Editor module. Once the upgrade is finished, enable it again in Modules › Module Manager, then install the version of the theme matching your new Prestashop version with the Theme update button.
Troubleshooting
| Problem | Solutions |
|---|---|
| The theme causes an error or a blank page |
|
| The side column of the theme doesn't appear |
|
| One of the modules doesn't appear or is not correctly placed |
|
| The theme doesn't look similar to the demonstration | Check that the theme is well configured as indicated in the part Configuration of this documentation. |
| Images are no longer displayed after installing the theme or are not correctly sized | Check that the images are well configured as indicated in the part Configuration of this documentation and regenerate the images after making sure they are properly configured. |
| The modifications applied in the module Prestacrea Theme Editor have no effect |
|
| The translations of the theme are not taken into account | Clear Prestashop cache by clicking on Clear cache in the section Advanced Parameters › Performance of your back-office. |
Configuration
General configuration
You can set the number of products per page in the section Shop Parameters › Product Settings.
Images configuration
To use a PNG logo with transparent background, you must check Use PNG only if the base image is in PNG format in the section Design › Images before loading your logo.
| Recommended sizes | Width (in pixels) | Height (in pixels) |
|---|---|---|
| Logo | 280 | 85 |
| Slider images | 800 to 1920 (mobile: 540) | 440 to 620 (mobile: 440) |
| Blocks images | 550 to 1920 | 350 to 620 |
Go to the section Design › Images and configure the images as indicated below:
| Name | Width (in pixels) | Height (in pixels) | Assignment |
|---|---|---|---|
cart_default | 100 | 100 | Products |
small_default | 50 | 50 | Products |
small_portrait_default | 50 | 75 | Products |
medium_default | 100 | 100 | Products |
medium_portrait_default | 100 | 150 | Products |
home_default | 280 | 280 | Products |
home_portrait_default | 360 | 540 | Products |
large_default | 600 | 600 | Products |
large_portrait_default | 600 | 900 | Products |
category_default | 1140 | 300 | Categories |
subcategory_default | 380 | 100 | Categories |
stores_default | 180 | 120 | Stores |
Modules configuration
Go to the section Design › Positions and place the modules as indicated below:
| Position | Modules |
|---|---|
displayBanner | Prestacrea Theme Editor |
displayNav | Contact information Currency block Language selector block |
displayNavFullWidth | Main menu |
displayTop | Search bar Customer "Sign in" link Shopping cart |
displayTopColumndisplayAltColumndisplayHome | Prestacrea Theme Editor |
displayHomeContent | Featured products New products Specials Custom text blocks Top-sellers |
displayWrapperTopdisplayWrapperBottom | Prestacrea Theme Editor |
displayHeaderCategorydisplayFooterCategory | Prestacrea Theme Editor |
displayLeftColumndisplayRightColumn | Faceted search Prestacrea Theme Editor |
displayProductAdditionalInfo | Social media share buttons Products comments |
displayProductListReviews | Products comments |
displayReassuranceactionProductOutOfStock | Prestacrea Theme Editor |
displayFooterProduct | Prestacrea Theme Editor |
displayFooterProductContent | Products comments Products in the same category |
displayShoppingCartFooter | Prestacrea Theme Editor |
displayFooterBeforedisplayFooter | Prestacrea Theme Editor |
displayFooterAfter | Newsletter subscription Social media follow links Prestacrea Theme Editor |
During the installation of the theme, some modules are automatically enabled or disabled. Moreover, the theme uses the default configurations of native modules except the following specific configurations:
| Featured products | Display 10 products |
|---|---|
| New products block | Display 10 products |
| Specials block | Display 10 products |
| Top-sellers block | Display 10 products |
| Products in the same category | Display 10 products / Display prices |
Those configurations may vary depending on the preconfigured model activated on your shop. You can however enable or disable the modules you want, add other modules according to your needs and configure all the modules as you want.
Use of Prestacrea Theme Editor module
Go to your back-office and go to the configuration of the module Prestacrea Theme Editor.
General configuration
This section allows to configure general settings of the theme.
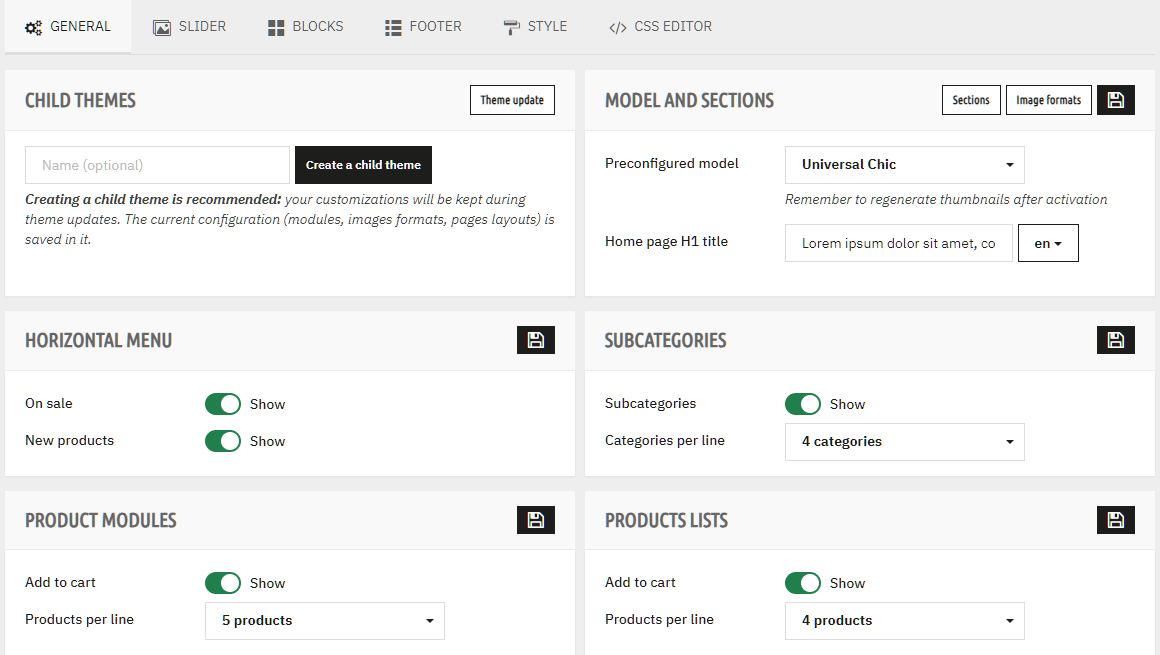
| Designation | Description |
|---|---|
| Child themes | Allows to create child themes. Creating at least one is recommended: your customizations will be kept during theme updates. The current configuration (modules, image formats, page layouts) is saved in it. Then enable the child theme in Design › Theme & Logo. Before switching themes, save the configuration in the child theme: it is applied again each time it is enabled. |
| Theme update | Allows to install a new version of the theme (see Theme update). |
| Preconfigured model | Allows to activate one of the 10 preconfigured models on your shop. Remember to regenerate thumbnails after activation. |
| Image formats | Allows to choose the image formats used by the theme. Product formats must have the same proportions. |
| Sections | Allows to set the display of the sections of the homepage, the product page and the category page: page or window width, list or carousel display, background color. |
| Home page H1 title | Main title of the homepage, important for SEO. Leave the field empty to display no title. |
| Horizontal menu | Allows to show or hide horizontal menu On sale and New products links. |
| Subcategories | Allows to show or hide subcategories in categories pages and to set the number of categories displayed per line. |
| Product modules | Allows to show or hide the add to cart button in product modules (featured products, new products, on sale, best sellers...) and to set the number of products displayed per line. |
| Products lists | Allows to show or hide the add to cart button on products lists and to set the number of products displayed per line. |
Slider configuration
This section allows to add, edit, disable or delete slides and to configure slider settings.
To add a new slide, click on the insert Add a slide at the top of the page to open the add form. To edit an existing slide, click on the edit icon next to the concerned slide to open this slide in the edit form.
Drag the slides in the list to change their order.
Demo slides cannot be deleted, but they can be disabled.
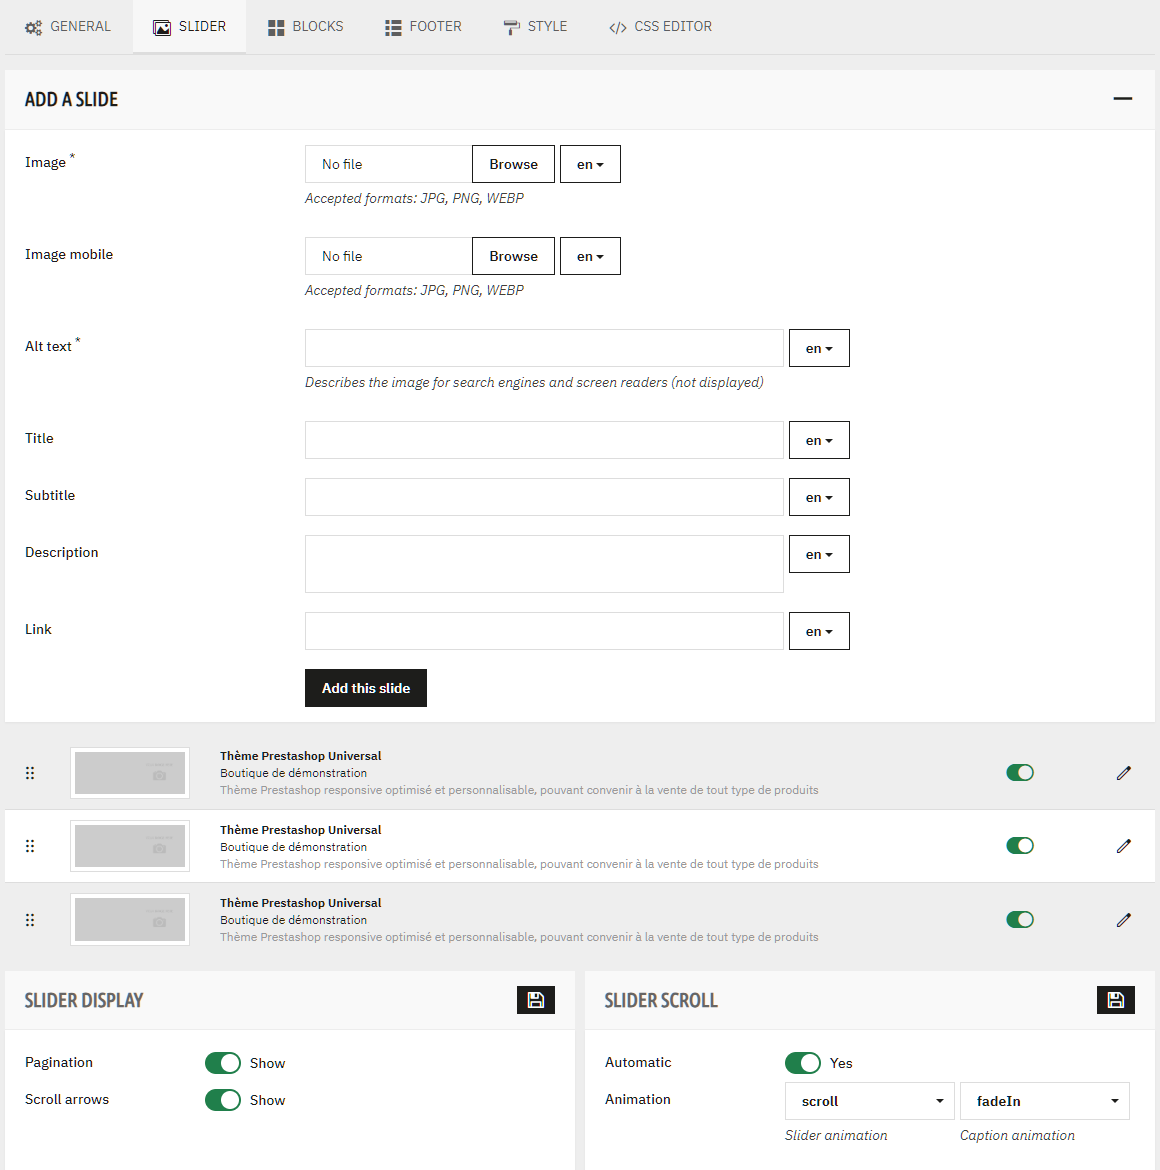
| Designation | Description |
|---|---|
| Add a slide | Allows to set the slide image (required) and an optional mobile image, displayed on screens up to 767px wide. The alt text (required) describes the image for search engines and screen readers. The title, subtitle and description make up the caption. Without button text, the link is placed on the whole slide. |
| Slider display | Allows to show or hide the pagination and the scroll arrows. |
| Slider scroll | Allows to set the automatic scroll of the slider as well as the slider and caption animations. |
Blocks configuration
This section allows to add, edit, disable or delete blocks. Blocks allow to display custom content (images, texts...) in many places of the shop.
To add a new block, click on the insert Add a block at the top of the page to open the add form. To edit an existing block, click on the edit icon next to the concerned block to open this block in the edit form.
Drag the blocks in the list to change their order.
Demo blocks cannot be deleted, but they can be disabled.
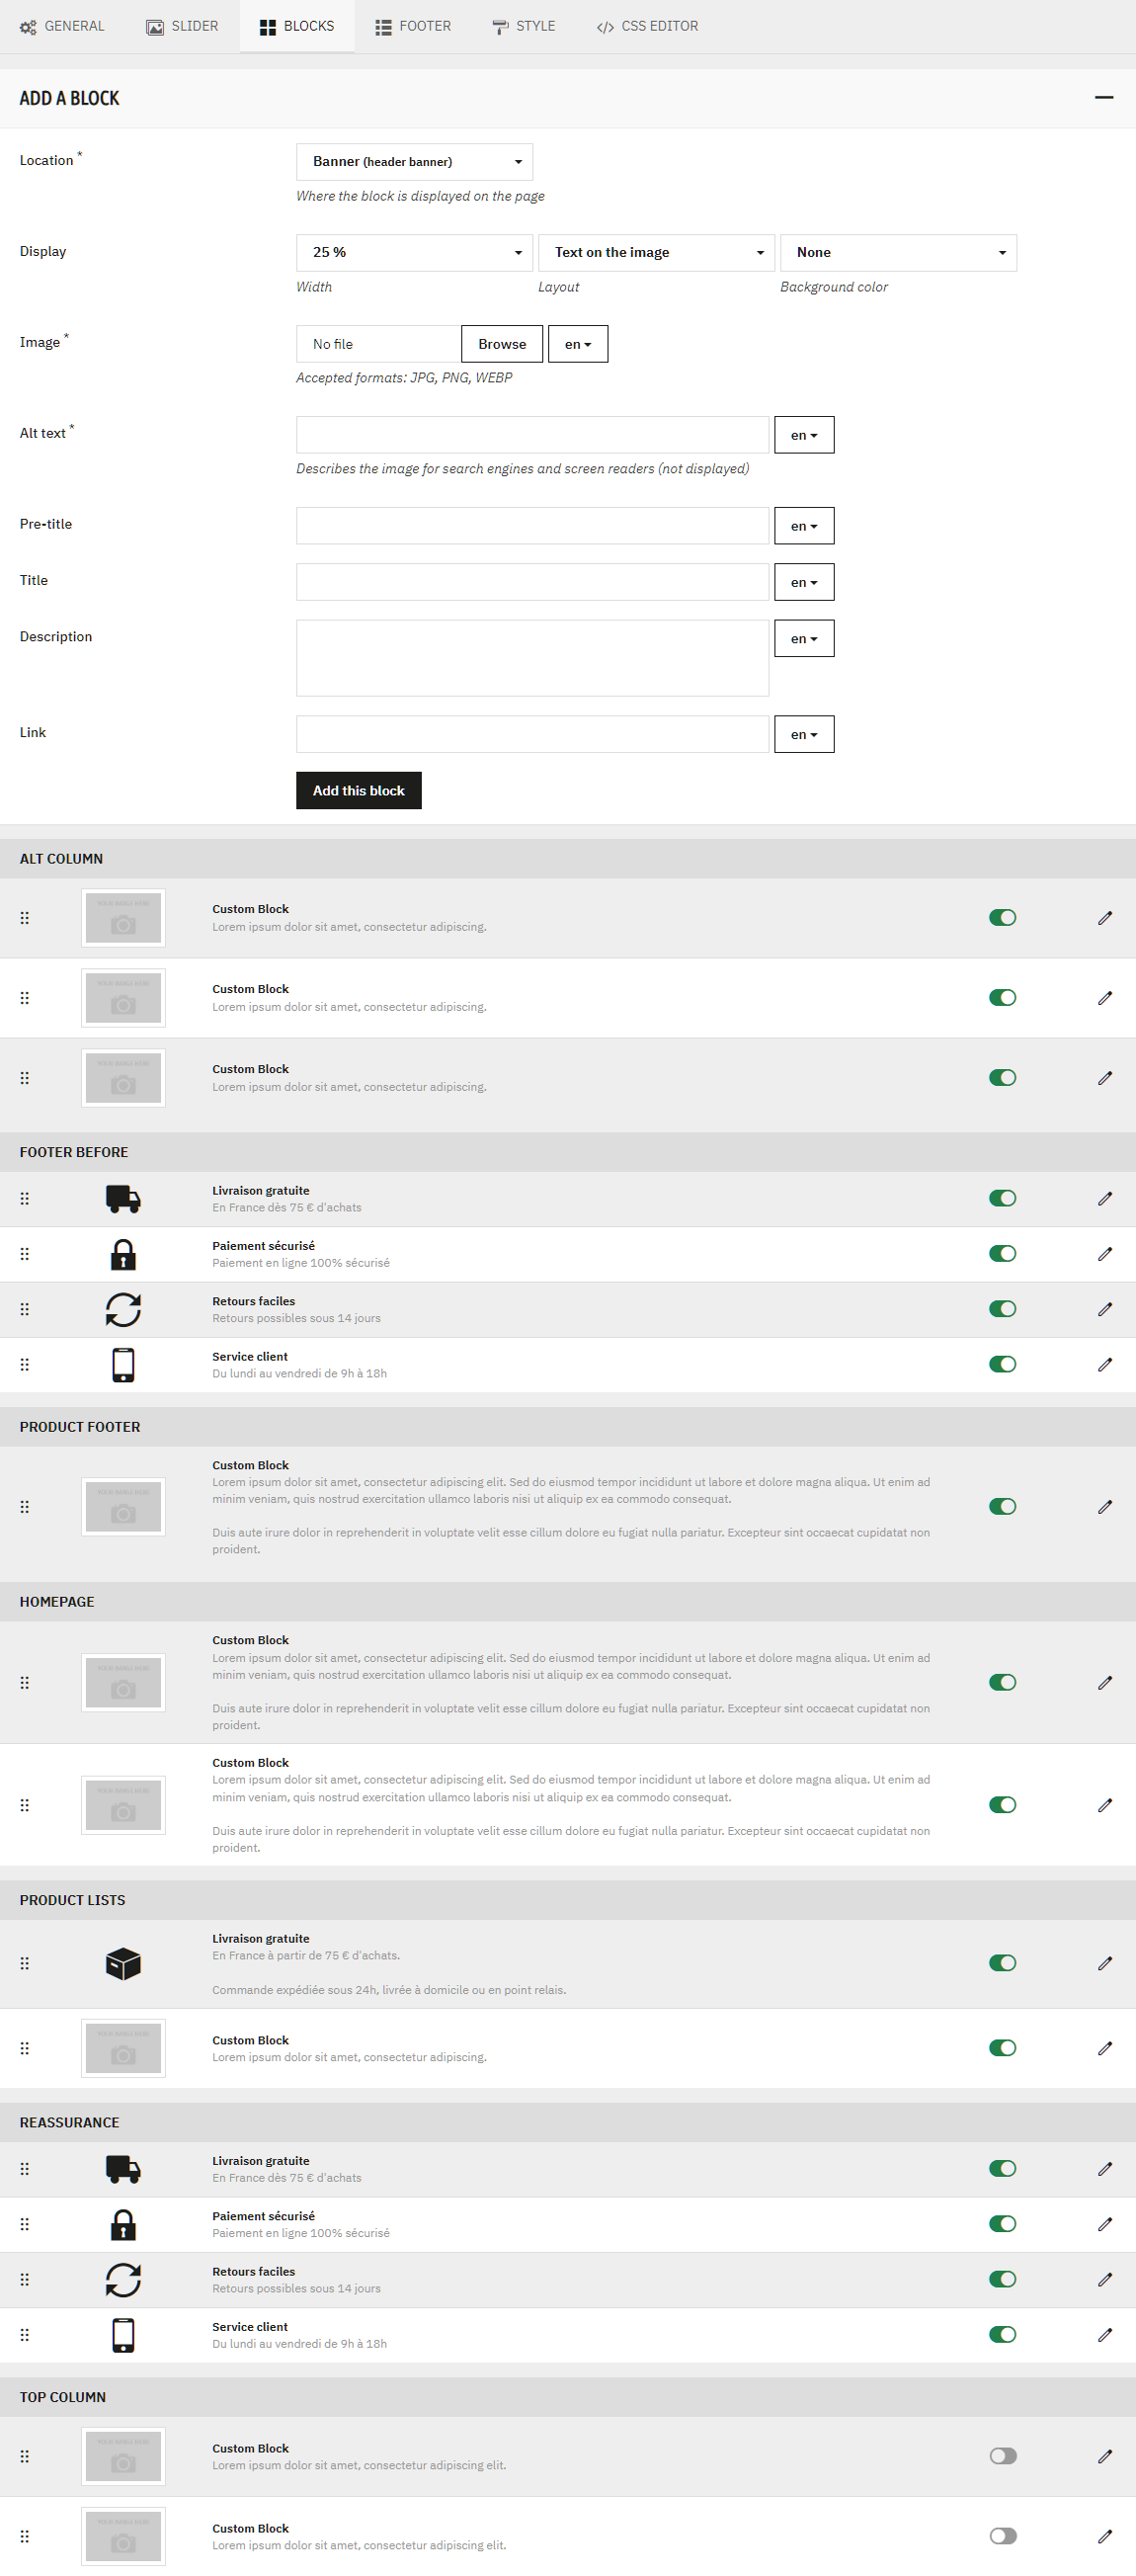
| Designation | Description |
|---|---|
| Location | Allows to choose where the block is displayed, among 17 locations: header, homepage, top and bottom of all pages, footer, columns, product lists, product page and cart. |
| Position | On the homepage and at the bottom of the product page, allows to place the block before, between or after the modules. In product lists, allows to insert the block after the product of your choice, once or repeatedly. |
| Pages | For product list locations, allows to limit the display of the block to some categories or pages (new products, prices drop, best sales, search, brands, suppliers). Without selection, the block is displayed on all product lists. |
| Display | Allows to set the width of the block, its layout (text on the image, image on the left, image on the right, text only, icon and text) and its background color. |
| Content | Icon ("Icon and text" layout), image and optional mobile image, alt text (required with an image), pre-title, title, description, button text and link. Without button text, the link is placed on the whole block. |
Footer configuration
This section allows to add, edit or delete footer links and to configure the footer image and text.
To add a new link, click on the insert Add a link at the top of the page to open the add form. To edit an existing link, click on the edit icon next to the concerned link to open this link in the edit form.
Drag the links in the list to change their order.
Demo links cannot be deleted.
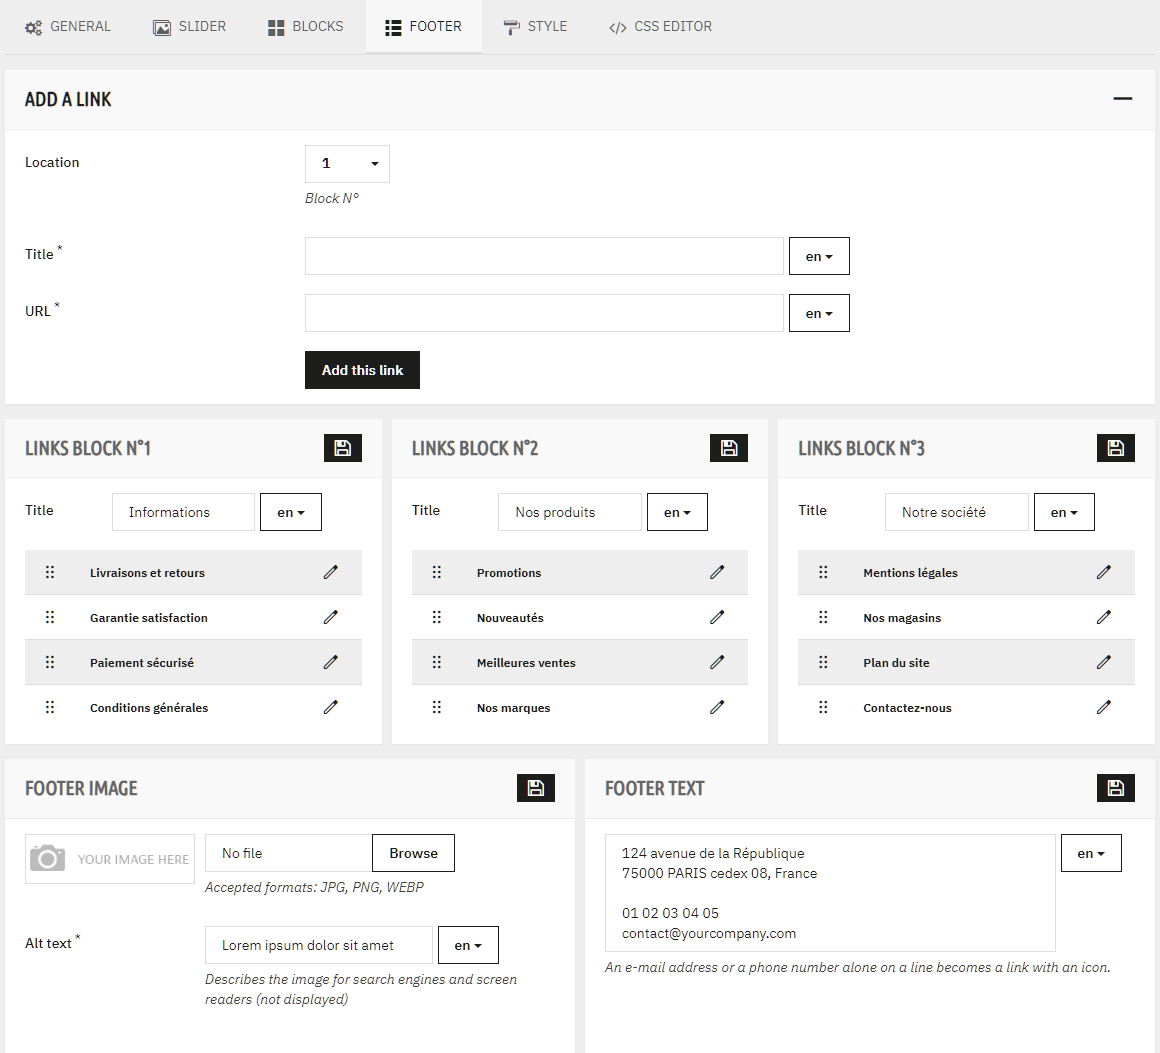
| Designation | Description |
|---|---|
| Add a link | Allows to choose the links block (1, 2 or 3) in which the link is displayed and to enter its title and URL. The title of each of the 3 links blocks can be modified. |
| Footer image | Allows to upload an image for the footer and to enter its alt text, which describes the image for search engines and screen readers. |
| Footer text | Allows to enter the text displayed under the image. An email address or a phone number alone on a line becomes a link with an icon: you can use it to display your contact details. |
Style configuration
This section allows to configure the graphical settings of the theme.
Colors are entered in hexadecimal format, preceded by the # symbol (example: #1a1a1a), or chosen with the color picker. For containers (header, homepage columns, page), the Transparent button of the picker allows to apply a transparency instead of a color.
When you use the color picker, click on Apply to confirm the chosen color.
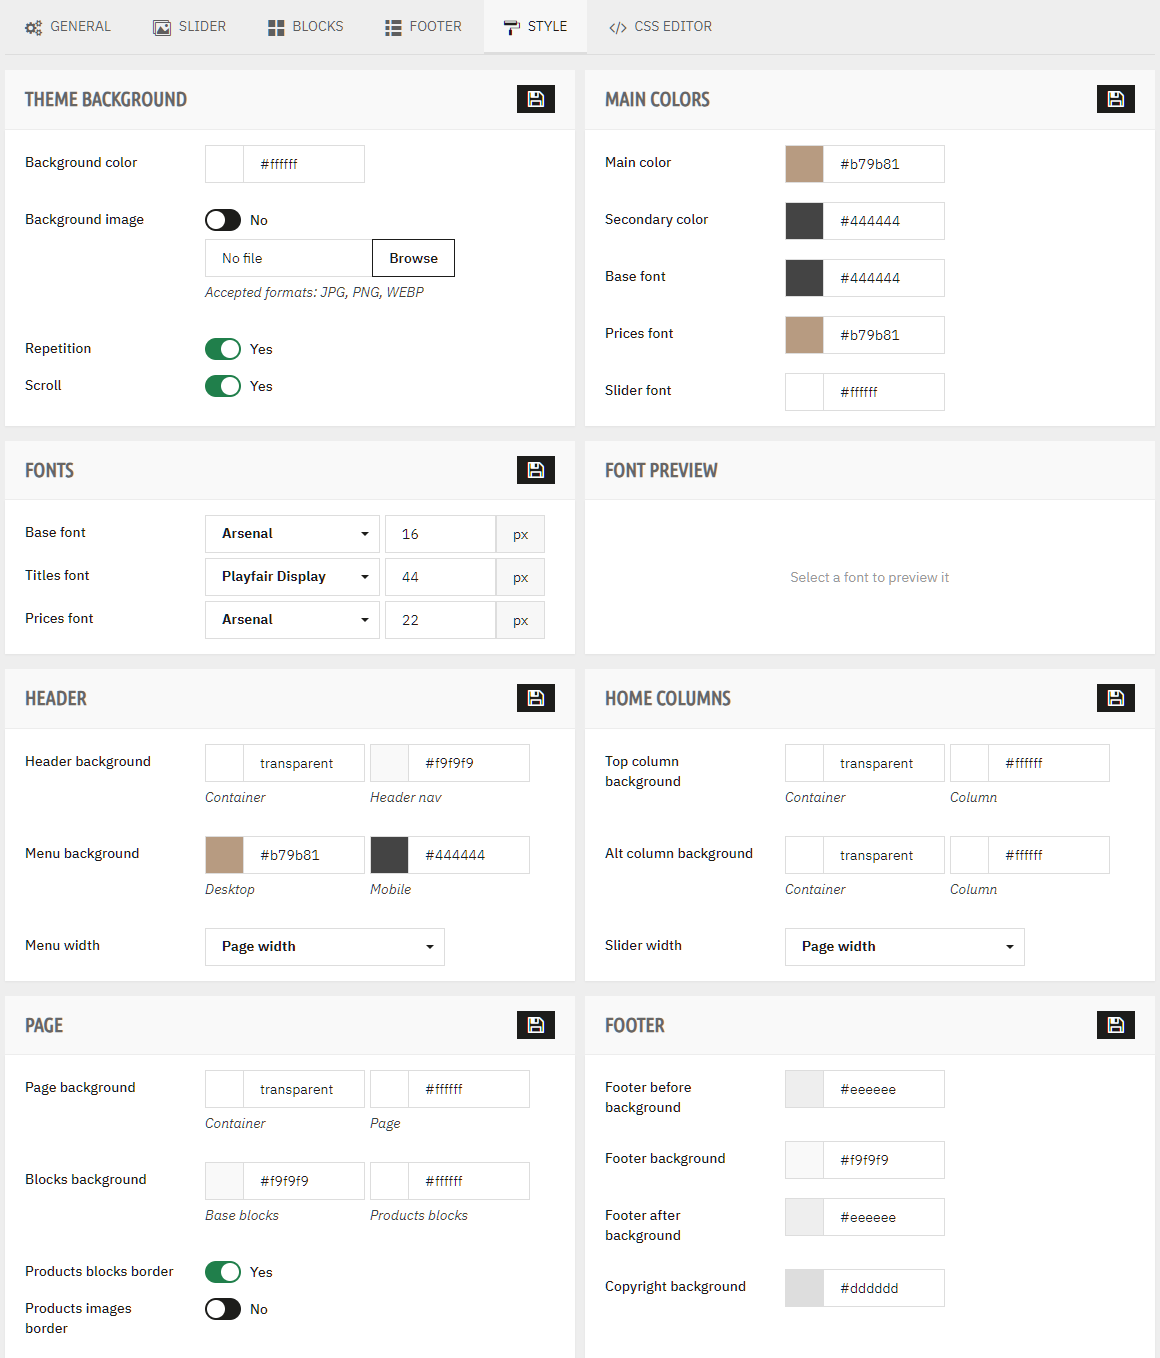
| Designation | Description |
|---|---|
| Theme background | Allows to set the background color of the theme, to load and display a background image and to set its repetition and its scroll. |
| Main colors | Allows to set the main color and the secondary color of the theme as well as the fonts colors. |
| Fonts and font preview | Allows to set the font families and sizes (text: 14 to 20 px, titles: 14 to 72 px, prices: 14 to 40 px) and to see an instant preview. Google fonts are downloaded to your server: no request is sent to Google when customers visit your shop. |
| Header | Allows to set the background color of header elements (container and header nav), to set the background color of the menu (computer and mobile) and to set the menu width. |
| Home columns | Allows to set the background color of homepage top and alt columns and to set the slider width. |
| Page | Allows to set the background color of page elements (container, page, base blocks and products blocks) and to assign or not a border to the products blocks and images. Base blocks correspond to all the blocks in the shop (blocks in left and right columns, form blocks, sitemap...). Products blocks correspond to the product blocks of the listings (featured products, products lists in categories, carousels in products sheets...). |
| Footer | Allows to set the background color of footer elements (footer before, footer, footer after and copyright). |
CSS editor
This section allows to add custom CSS code in the file _custom.scss of the theme.
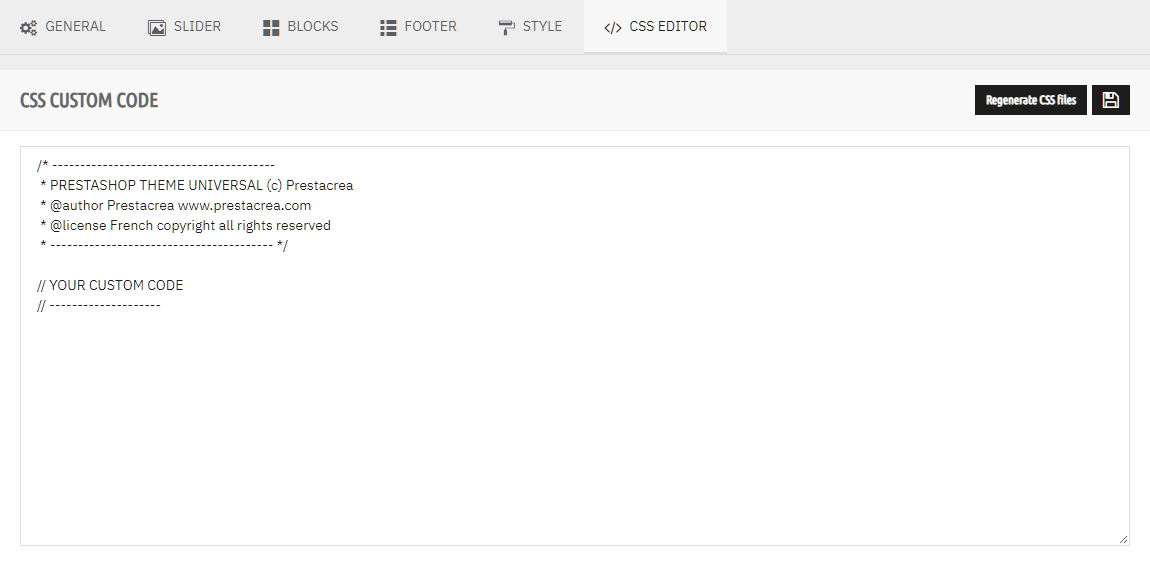
You can freely use CSS syntax or SASS syntax. You don't need to add vendor prefixes for compatibility with different browsers as the module compilation includes an autoprefixer. You can also directly edit the _custom.scss file in the folder assets › css › scss of the theme with the editor of your choice.
The button Regenerate CSS files allows to manually compile the SCSS files and generate the CSS files for the activated preconfigured model. You must regenerate CSS files every time you make a modification in the SCSS files (including from the CSS editor) otherwise your modifications will not be visible on your shop.
Your changes made through the CSS editor or directly in the _custom.scss file are kept during theme updates. To modify the theme templates, create a child theme.
In multistore, the code entered in the CSS editor for a shop other than the main shop is saved in a file specific to this shop (for example _custom_2.scss for shop no. 2).
For more info about SASS syntax: sass-lang.com/documentation
License and copyright
License
This theme is protected by the laws in force on intellectual property and copyright.
The purchase of this theme is accompanied by the granting of a non-exclusive use license valid for a single shop and for the entire legal duration of copyright protection. To use this theme on several shops, you must purchase as many themes as shops on which you want to use it.
One theme purchased = One use license for this theme, valid for a single shop
The purchase of this theme does not imply any transfer of intellectual property rights. The license granted only authorizes the use, the representation and the adaptation of the theme. Any reproduction, exploitation or distribution, integral or partial, by any means whatsoever, without the prior written consent of Prestacrea, is strictly prohibited and constitutes a forgery offense. It is forbidden to redistribute this theme, modified or not, for free or paid, and by any means whatsoever.
Copyright
You are free to modify, hide or delete the copyright mention integrated into the footer of the theme.
Technical support and updates
Technical support
Technical support is provided for issues related to the use and to the operation of the theme but under no circumstances for its customization or adaptation to your needs.
Technical support is not provided for issues related to the use of third-party services (Prestashop CMS, third-party modules, hosting...) and which do not directly concern the theme. In case of difficulties with the use of Prestashop CMS, please consult the official documentation: docs.prestashop-project.org
Technical support is provided only for a theme that has not been modified by you or by a third party, and in the context of a use in accordance with specifications indicated in technical sheets (compatibility, languages...).
In some cases requiring an intervention, Prestacrea may need an access to the back-office of your shop and to your FTP server. You declare that you agree to waive technical support if you refuse to provide these accesses.
Updates
The updates included with the purchase of this theme include bug fixes, improvements and optimizations, features additions and upgrades to future minor versions of Prestashop (eg. upgrade from 9.0.0 Prestashop version to 9.1.0 version). They do not include upgrades to future major versions of Prestashop (eg. upgrade from 9.0 Prestashop version to 10.0 version).
Prestacrea reserves the right to suspend the distribution of this theme at any time and without notice. Theme updates will then no longer be provided.
Changelog
- Complete redesign of the theme and of the Prestacrea Theme Editor module
- New installation required: no update possible from 1.x versions
- Added theme updates from the back office and child themes creation
- Added customizable sections, new block locations and layouts, quick add to cart and side cart
- Improved code, performances, SEO and accessibility
Previous versions
- Updated node modules
- Fixed standardized values in quantity input
- Fixed error during theme installation
- Improved fonts management
- Improved design and code
- Initial release
Need help?
A question about the theme? The technical support answers you within 24h, excluding weekends and holidays.